This tutorial will show you how to give a comic book look to your photos using a couple of filters and some additional decorations. Tutorial ini akan menunjukkan cara untuk memberikan buku komik untuk melihat foto Anda menggunakan beberapa filter, dan beberapa tambahan hiasan.
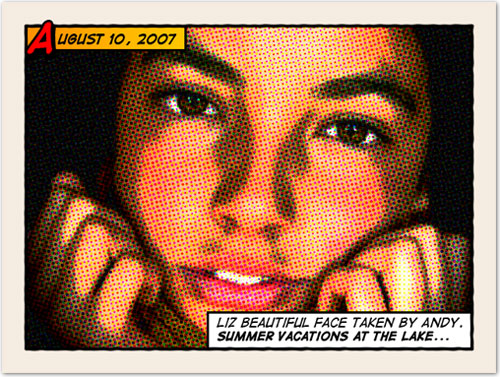
Click on the image below to see a larger and more clear image of the final results. Klik pada gambar di bawah ini untuk melihat lebih besar dan lebih jelas gambar dari hasil akhir.
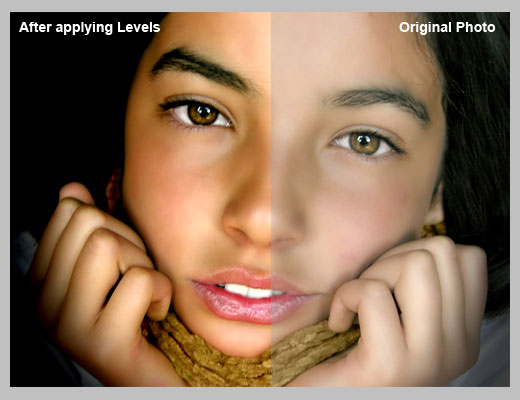
Original image by Gambar asli oleh Rubén Colorado Rubén Colorado
Old halftone print effect Lama setengah suara efek cetak
Download and open this photo in Photoshop. Download dan buka foto ini dalam Photoshop. Now we are going to increase the overall contrast of the picture by burning it a bit. Sekarang kita akan meningkatkan keseluruhan kontras gambar oleh pembakaran itu sedikit. Go to IMAGE > ADJUSTMENTS > LEVELS… With this image we are going to set the INPUT LEVELS to 60 / 1.00 / 220 . Go to IMAGE> penyesuaian> TINGKAT ... Dengan gambar ini kita akan mengatur INPUT TINGKAT 60 / 1,00 / 220. But this is only for this example. Tapi ini hanya untuk contoh ini. Choose the best settings for each photo. Pilih pengaturan yang terbaik untuk setiap foto.
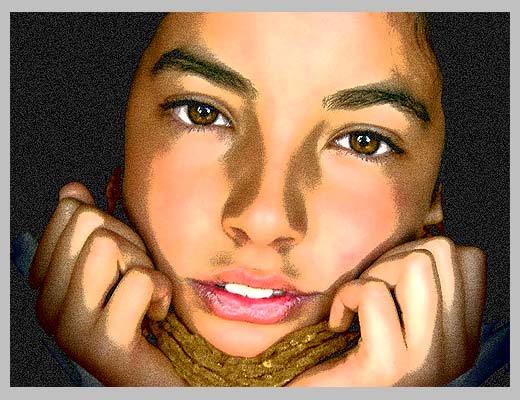
In this step we are going to give the photo an illustrated look with some graininess to give the illusion of an old and bad quality paper. Dalam langkah ini kita akan memberikan sebuah ilustrasi foto terlihat dengan beberapa graininess memberikan ilusi yang tua dan buruk kualitas kertas. It is not a realistic effect, it is just some distortion to the image to help us achieve the final look. Ini bukan efek realistis, sekarang hanya beberapa distorsi pada gambar untuk membantu kami mencapai final terlihat. Go to FILTERS > ARTISTIC > FILM GRAIN . Go to filter> artistik> FILM Grain. In this case we are going to use: GRAIN: 4, HIGHLIGHT AREA: 0, INTENSITY: 10. Try different settings for different photos. Dalam hal ini kita akan menggunakan: Grain: 4, Highlight AREA: 0, Intensity: 10. Coba berbagai pengaturan untuk foto yang berbeda.
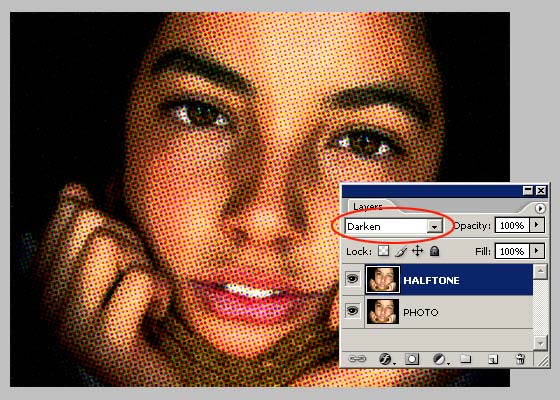
Duplicate the layer and name the new layer HALFTONE Duplikat layer dan nama lapisan baru setengah suara
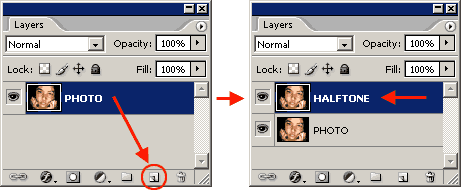
In this step we are going apply a halftone pattern to the image to give the final old comic book printing effect. Dalam langkah ini kita akan menerapkan pola setengah suara pada gambar memberikan akhir tahun buku komik pencetakan efek. Go to FILTER > PIXELATE > COLOR HALFTONE. Set MAX RADIUS: 4 and leave the rest with the default values. Menuju ke FILTER> PIXELATE> WARNA setengah suara. Tetapkan MAX Radius: 4 dan membiarkan sisanya dengan nilai-nilai default. Press OK and then go to the LAYERS PALETTE and set the BLENDING MODE to DARKEN. Tekan OK dan kemudian pergi ke palet Layers dan mengatur campuran MODE ke gelap.
Adding comic book elements to the picture Menambahkan elemen buku komik ke gambar
The effect looks nice so far. Efek terlihat baik sampai sekarang. It is not a realistic old comic book effect, it simple resembles that look. Ini bukan buku komik lama realistis efek, ia menyerupai sederhana yang terlihat. To make it more real, now comes the fun part. Untuk membuatnya lebih nyata, sekarang tiba bagian menyenangkan. We are going to add some unique elements that are very popular on comic books and strips Kami akan menambahkan beberapa elemen yang unik yang sangat populer di komik strip dan buku
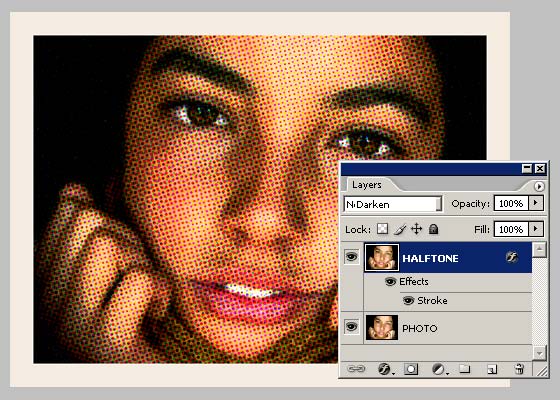
Select the HALFTONE layer and set a STROKE LAYER STYLE of WIDTH: 20px , POSITION: Inside and COLOR: #F5ECE1 . Pilih lapisan setengah suara dan menetapkan Stroke Layer STYLE dari width: 20px, POSITION: Di dalam dan WARNA: # F5ECE1.
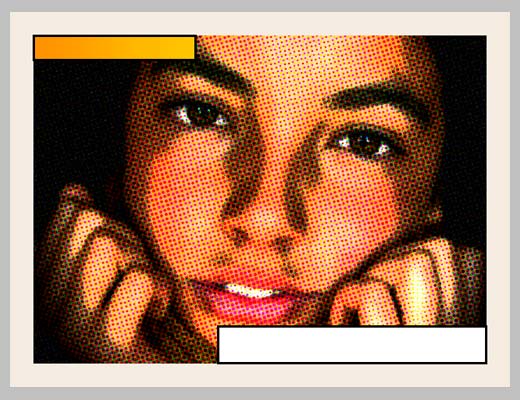
Add a new layer and draw a small rectangle at the top left of the frame of the image. Menambahkan lapisan baru dan menarik kecil segi empat di bagian kiri atas bingkai foto. Give it a STROKE of 3 pixels and paint it orange. Give it a Stroke dari 3 pixel dan cat orange itu. An orange to yellow gradient looks better. Sebuah jeruk kuning ke lereng tampak lebih baik. Draw another rectangle, a bit larger this time, on the lower left corner of the frame. Draw rectangle lain, sedikit lebih besar saat ini, di sudut kiri bawah frame. Give it a STROKE of 3 pixels and paint it white. Give it a Stroke dari 3 pixel dan cat putih itu. The final result should be like the one below: Hasil akhir yang harus menjadi seperti salah satu di bawah ini:
Lets add a border to the image: Add a new empty layer above the layer containing the rectangles we created in the previous step. Lets menambahkan perbatasan pada gambar: Tambah baru kosong layer diatas layer yang berisikan Rectangles kita buat di langkah sebelumnya. Select the RECTANGLE SELECTION TOOL from the TOOLS PALETTE. Draw a selection from the top left (right inside the frame) to the bottom right border of the image. Pilih rectangle selection tool dari ALAT palet. Draw pilihan dari arah kiri atas (tepat di dalam bingkai) ke bagian bawah kanan batas foto.
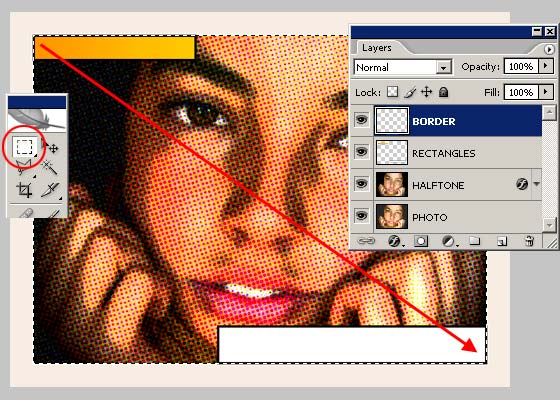
Go to EDIT > STROKE, set WIDTH: 4px, COLOR: BLACK, LOCATION CENTER and press OK. Go to EDIT> Stroke, set width: 4px, WARNA: BLACK, LOKASI PUSAT dan tekan OK.
DESELECT the current selection and go to FILTER > BLUR > BLUR MORE. Then apply a small distortion using FILTER > DISTORT > RIPPLE… (Amount 20%, Size Medium). Now, lets sharpen the stroke a bit with FILTER > SHARPEN MORE and there you have a nice simulated hand drawn border. Hapus pilihan saat ini dan pergi ke FILTER> Buram> Buram LEBIH. Kemudian menerapkan kecil distorsi menggunakan PENYARING> memutarbalikkan> ripple ... (Jumlah 20%, Ukuran Sedang). Sekarang, mari kita pertajam stroke yang sedikit dengan PENYARING> Pertajam LEBIH dan ada you have a nice simulasi tangan diambil perbatasan.

Adding captions using a comic book font Menambahkan keterangan buku komik menggunakan font
To add captions to the photo you can use any font you like, but only using fonts specially designed for comic books you will be able to achieve the desired look. Untuk menambah keterangan untuk foto Anda dapat menggunakan font yang Anda suka, tetapi hanya menggunakan font yang dirancang khusus untuk buku-buku komik anda akan dapat mencapai yang diinginkan terlihat. Download the free font Digital Strip and install it. Download gratis font Digital Strip dan menginstalnya. At the end of this article you will find a lot of free and commercial comic book fonts and resources. Pada akhir artikel ini Anda akan menemukan banyak gratis dan buku komik komersial font dan sumber daya.
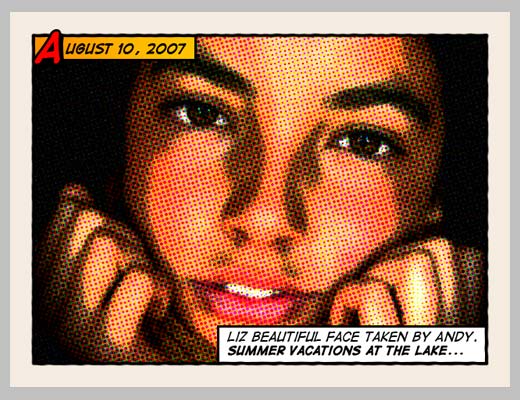
Using the Digital Strip font you've just downloaded, type a date on the top orange rectangle. Menggunakan Digital Strip font baru saja anda download, ketik tanggal di atas jeruk rectangle. Play with the first letter of the text by adding a stroke, a shadow and a bright contrasting color. Bermain dengan huruf pertama dari teks dengan menambahkan stroke, sebuah bayangan dan contrasting warna cerah.
Then write a caption for the photo at the bottom white rectangle. Kemudian menulis keterangan untuk foto di bawah putih persegi panjang. Highlighting some words in bold also looks good. Penyorotan beberapa kata dalam huruf tebal juga terlihat baik.
And that's all. Dan itu semua. Your image should look similar to the one below: Gambar Anda akan terlihat mirip dengan salah satu di bawah ini:
Click on the image to see a larger and uncompressed version. Klik pada gambar untuk melihat versi yang lebih besar dan Tak terkompresi.

Tidak ada komentar:
Posting Komentar